
If you are coming from Microsoft Word or PowerPoint, Excel can be surprisingly frustrating. You look at the ribbon, search for the familiar Bullet Point button, and… it is simply not there.
Does this mean you cannot create professional lists in your spreadsheets? Absolutely not.
While Excel is designed for numbers, it is also used for dashboards, to-do lists, and reports. Learning how to add bullet points in Excel is essential for organizing text and making your data readable.
In this comprehensive guide, we will explore 6 different methods to insert bullets. From keyboard shortcuts and automatic formatting to advanced formula tricks and visual SmartArt.
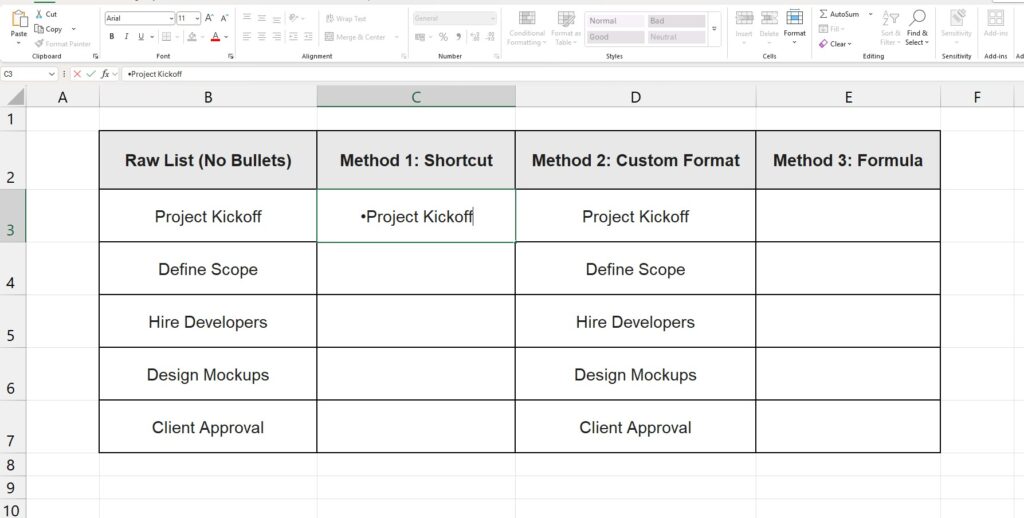
Method 1: The Keyboard Shortcut (Fastest)
The quickest way to insert a bullet symbol is using a specific key combination. This is perfect when you just need to add a single bullet to a cell header. This is the most popular method for those learning how to add bullet points in Excel quickly without complex menus.
The Numpad Trick
- Select the cell (double-click to enter edit mode).
- Press and hold the
Altkey. - Type
7on your numeric keypad. - Release
Alt.
A solid black bullet (•) will appear instantly.
What if I don’t have a Numpad?
If you are using a smaller laptop without a side number pad, the standard number keys above the letters will not work. You have two options:
- Try
Alt + Fn + 7(on some laptops). - Or copy and paste this bullet right here: •
Fun Tip: You can try other shapes too!
Alt + 9= Empty circle (○)Alt + 254= Square (■)Alt + 16= Arrow (►)
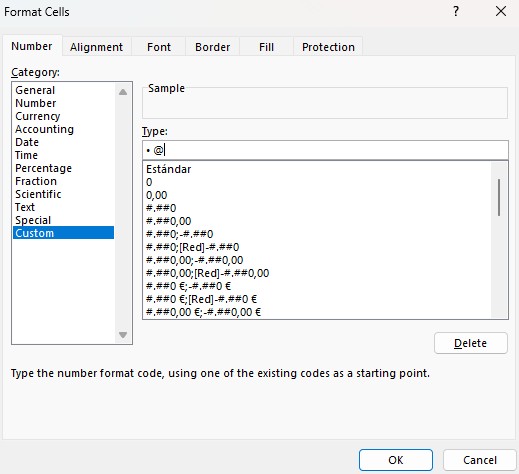
Method 2: Custom Formatting (The “Magic” Automation)
If you want to know how to add bullet points in Excel automatically, this is the Pro method. It allows you to type normal text, and Excel will automatically add a bullet point for you the moment you press Enter. It is perfect for long lists where you don’t want to type the symbol every time.
Step-by-Step:
- Select the entire range of cells where you want your list to appear (e.g., A2:A10).
- Press
Ctrl + 1to open the Format Cells dialog box. - Go to the Number tab and select Custom from the list on the left.
- In the “Type” box, delete the word “General”.
- Paste the following code:
• @(Note: The@symbol tells Excel “put the text here”. The bullet goes before it). - Click OK.
Now, test it out. Type “Meeting with boss” in one of those cells and hit Enter. Excel instantly converts it to “• Meeting with boss”.
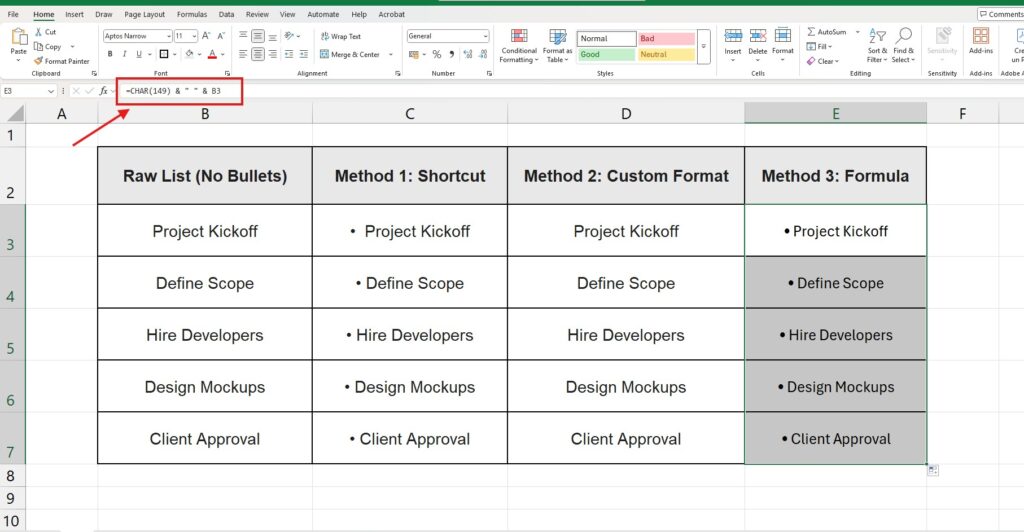
Method 3: Using Formulas (Combining Data)
What if you already have a list of 100 items in Column A, and you want to turn them into a bulleted list in Column B? Retyping them is a waste of time.
We can use the CHAR() function combined with the ampersand (&) operator.
The Formula: =CHAR(149) & " " & A1
This formula is a lifesaver when you need to figure out how to add bullet points in Excel to thousands of rows at once.
How it works:
CHAR(149)generates the bullet symbol (•).& " " &adds a space for separation.A1takes your original text.
Simply drag the Fill Handle down, and your entire column will be formatted instantly.
Note: If CHAR(149) doesn’t look right on your computer, try CHAR(7).
Method 4: Insert Symbol (The Visual Menu)
For users who prefer a visual interface when learning how to add bullet points in Excel, the Symbol menu is the best friend.
- Go to the Insert tab on the Ribbon.
- Click on the Symbol icon (usually on the far right).
- A window will pop up.
- Scroll through the fonts (standard fonts like Arial or “Wingdings” have the best icons).
- Select the symbol you like and click Insert.
This method is slower, but it gives you the most variety in design.
Method 5: Multiple Bullets in One Cell (Line Breaks)
Sometimes, you don’t want a list in separate rows. You want a compact list inside a single cell.
To do this, you need to master the Line Break shortcut.
- Type your first bullet using the shortcut:
Alt + 7. - Type your text (e.g., “First Item”).
- Do NOT press Enter. Instead, press
Alt + Enter. - This moves the cursor to a new line inside the same cell.
- Repeat the process for the next item.
When you are done, press Enter. You may need to adjust the row height or click “Wrap Text” to see everything clearly.
Method 6: SmartArt (For Presentations)
If you are building a dashboard for a presentation and you want something that looks like a PowerPoint slide, use SmartArt.
- Go to Insert > SmartArt.
- Choose the List category on the left.
- Pick a style (e.g., “Vertical Bullet List”).
- A graphic box will appear floating over your sheet.
- Type your text into the box.
This isn’t inside the cells (it floats on top), but it is the most visually impressive way to present a list in Excel. While it floats above the cells, it is a valid strategy when asking how to add bullet points in Excel for high-end presentations.

Pro Tip: How to Make Colored Bullets
One limitation of Method 1 (Shortcut) is that the bullet is the same color as the text. If you want a Red Bullet with Black Text, you have to use a trick.
- Use Method 2 (Custom Formatting) described above.
- Modify the code in the “Type” box to add a color tag.
- Use this code:
[Red]• @
Now, Excel will automatically paint the bullet red, but keep your text in the default color. You can use [Blue], [Green], or [Color45] for specific shades.
Conclusion: Mastering How to Add Bullet Points in Excel
Just because Excel lacks a dedicated “Bullet” button doesn’t mean your data has to look messy. Knowing how to add bullet points in Excel gives your spreadsheets a polished, professional finish that stands out.
- Use Alt + 7 for quick edits.
- Use Custom Formatting for automated lists.
- Use SmartArt for high-end dashboards.
Now that your list is beautifully formatted, you might need to clean up the data itself. Check out our guide on How to Remove Duplicates in Excel or learn How to Combine Two Columns to organize your text even further.
Pingback: How to Make a Copy of an Excel Sheet: 3 Fast Ways (2025)